Saturday, September 28, 2013

sampler under way

I'm currently doing a sampler because I had trouble with some techniques when working on the last piece I wove (shown on my blog back in June, http://weavingrainbow.blogspot.com/2013/06/tapestry-weaving.html) I figured a little help with joins would be wise.. and while reading about the sampler, I had forgotten about lazy lines for large blocks of color.  I'm still wondering about them, maybe under a certain size, they aren't necessary?

I'm following Kathe Todd Hooker's book, Tapestry 101 at the moment (but using butterflies because bobbins aren't in the budget & I can't find 4" golf tees locally & don't think I want to use dowels either... even Glimakra's bobbins at $3.50 each aren't in the budget at the moment... so.. butterflies. 

I'm and also reading my other books about the technique. Although this can be confusing, I'm finding that reading one, then reading another helps clarify things & also once I started working on the wavy lines technique, i found it interesting that Carol Russell's instructions for the inital wavy lines selvedge was done horizontally instead of in sections as shown in Tapestry 101.

Just for grins, I may try weaving a block of solid (or semi-solid, for interest, but ONE YARN) color, weaving straight across on one of the paperback looms & using lazy lines, same yarn, same warp, same size on another piece & compare. Might not be able to see the difference in that small scale, though?  I may not do this, but it's an idea... 

Still no pictures, partly because the background where the loom is located is a mess right now & partly because only a little bit is done, and partly because it's a cloudy day... maybe tomorrow... maybe I'll just cover up the mess...or put a cloth behind the loom (which would show the weaving better, anyway!)

The loom calls! Ta-ta my pretties!

Monday, September 23, 2013

Since I wrote last, I picked up a Crisp tapestry loom.  I have it warped with the warp that was on it: I pulled out the 1 or 2" of weft (acrylic, eeek!) and then I undid the warp and rolled it into 3 balls. (There were 3 knots in the warp, so I made 3 balls since I don't want to warp all the way across right now.  The warp feels like some kind of strong cotton. (It doesn't break easily when I pull with my hands.) I wonder if it is carpet warp?

 Here is a photo of the loom at the seller's, I still have not taken my own photos of it:


I put on 51 or 61 strands (51 plus the edges: 3 as 1 and 2 as one, which I'm hoping will give me straight selvedges).. so far I like the loom & the tensioner is great..  the shedding device is simple & I may come up with some other shedding device for it later on, I don't know: right now, I use the "magic heddle" to create enough of a shed to stick a shed stick in, and since my loom came with 2 simple shuttles, I'm using one of them as a shed stick since I won't be using either of them to carry yarn... that's just not my way, besides I'd have to have a zillion of them: one for each color.

I haven't tried bobbins (maybe I tried them years ago, I don't remember) and it looks like I'll be using my fingers to pull the weft through the shed instead of a crochet hook, so I may learn how to wind a butterfly properly: in the past, I've had trouble keeping a butterfly from making a huge tangly mess, so maybe I WILL use bobbins, I don't know.  With my smaller looms, I have been able to leave a long length of yarn like one would use for needlepoint or cross stitch, but with the bigger looms, this could be problematic, so I will see!

I won't need to use a crochet hook to pull the weft through the sheds now that I can have EITHER shed open. This is awesome for me!

I haven't decided what to weave first: I don't know if I should do a sampler to refresh some of the techniques, particularly the various interlock techniques... and weft directions... or do something more interesting than that.. or both. There's PLENTY of warp (about 7 or 8 feet since I warped the loom with a dowel in back so that I can use all of the warp).. but I doubt the warp is quality warp, and because of that I opted to use Briggs & Little Regal which is reasonably easy to get... the next warp I'll use will be a good quality, probably cotton seine twine, which I will get as soon as I can afford it.

We WILL still be finishing the copper loom: this loom may be my go-to loom, though, it's wider than the copper loom will be...

I currently have 2 paintings showing at the Wine Therapist in Dallas. One is mixed media with acrylic paint, threads, sequins and rhinestones;  the other is acrylic paint on canvas. We didn't get to the opening because of Gary's work schedule: if he had been able to get out at exactly 10pm, we might have made it. We still need to get over there to see the show. Maybe next time he has a day off...

The paintings feature my character "Girl-Blob", which I came up with in the late 1970s when I was in college. I found a couple of pictures of her when browsing through my old sketchbook. I'm glad we didn't lose the storage stuff in the wildfire for sure!

No photos today (except for the Crisp loom photo) maybe next time!

Friday, September 6, 2013

Building a loom

The process of building my larger loom is going slow, but we're having to gather all the needed pieces. Today the bottom spring kits came for the 22" wide loom and the smaller 10-1/2" loom. The 8" spring kit fit perfectly in between the elbows at the top of the smaller loom:


I loosened the warp so that I could install the tray for the sping & then put a spring in and then put all the warps in place. I used the 8 dent spring.  Since the loom was already warped, I didn't want to take the warp off to re-do it, so I have 2 or 3 extra warps on each side.  It'll be nice not having to adjust the spacing of the warps before each weaving session!

I plan to take out the green header seen in the above (2nd) photo and doing it over so that the spacing lines up with the spring...


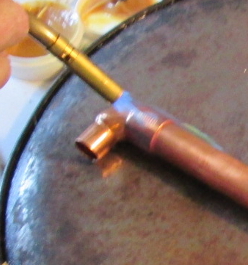
The following 2 photos show Gary using the torch to solder the elbows to the top section of the loom:


There is still more assembly to do and we need to pick up the 24" threaded rods from one of the hardware stores next week.

We've been taking care of a kitty in the park, bringing food and trying to develop trust.  I don't know if it's a male or female, but s/he is cautiously friendly.  The last 3 times, s/he has been sitting closer  to us, but won't let us get close tnough to pet. The kitty's name is Pelham, after the park. 


Off to paint...

Thursday, August 15, 2013

I have been doing a little bit of weaving on my tapestry looms, mostly playing & MOSTLY reading, and in the next few days, with the help of my other half, I will be building a loom that is a cross between a Mirrix loom & Archie Brennan style loom. I'm getting a Mirrix shedding device, and may be picking up the copper pipes this weekend. I may wait until the shedding device gets here, first, so I can take the clips along with me to make sure they fit. It'll be a big-ish loom, 22" wide, and I'm not sure yet how tall.

Here is a picture of one of my small looms:


Here is a picture of the back, showing how I warp so that I can rotate the warp up & down. I alternate looping the warp at the top & bottom of the bar after going around the loom:


And a closeup of it:


Next time I warp one of the smaller looms, I'll find a yarn that is easier to see for a good closeup.

I have been following Ayala's blog for over a year now & she has been blogging for 8 years! To celebrate, she is doing a giveaway:

lHere is the link to Ayala's blog

I took her basic faces class & love it: that is one of the things that she may be giving away!


Wednesday, June 26, 2013

Tapestry Weaving

Well, I don't know if I should revive my Rambling Warps blog or consider tapestry weaving a part of painting, since I'm painting with yarn... doesn't matter, I'll just post it here! :)

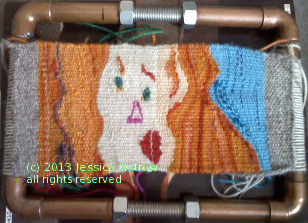
I did a postcard sized piece that I cut off the loom this morning... it's based on my Girl Blob character... I have a few drawings that I've done of her and did this piece on the loom:


The first picture is still on the loom & the 2nd one is off.
The photo is from my camera, 3 megapixels, so no enlarging or showing any details.  My point and shoot camera has gone into hiding, but I plan to get another sometime soon, maybe as soon as next week.

I still have to finish securing the warp ends on the back, wash & block & hopefully it will look straighter after blocking. if not, I'll just check it up to 2 things:

1: I need to learn how to weave straighter selvedges & 2: Girl Blob is not a neat & tidy, carefully made up & dressed character, so the edges can reflect her beautiful imperfections!
I had fun with this and loved doing her hair and the water.  Sometime before the week is up, I hope to do a painting of her sleeping... I have a few drawings colored with watercolor & inktense, but they will live in my sketchbook forever...

After it's blocked, I will attach a muslin backing and frame it somehow. I'm still not 100% sure how I'll frame & mount it yet, but I'll figure that out... I'm planning to hang it at the Chisholm Trail Artists Association art show on Saturday.

Monday, March 4, 2013

A whole bunch!

Since I'm not terribly fond of posting everyime I finish something, I'm doing the last few days in a bunch... first.. that farm painting that I mentioned in my last post... I did some more work on it & I am STILL not happy with it... not sure what direction to take it in at this point, but will probably let it sit for a while.. I'd like to figure out some way to make it more playful. I like what I did with the road.. and the trees. Maybe I could work some bricking into the leftmost building. The horse is something a baby could have done. Here's 3 pictures of it: the reference photo, the first draft from last week & the latest edition of it:


Suggestions welcome, I think... or maybe I just need to keep on painting & eventually I'll just get better. Maybe I'll come back to this or maybe I'll gesso it and paint over it.

I did 3 pictures from the book that I did the horse from. A couple of people thought that the horse was paint by number!  I'm not sure what to think of that, haha, but I sure hope that once I get better, my style won't LOOK paint by number-ish! This is the link to the book:

Foster Book 305 Acrylic: Animals

The one of Indy is my 3 year old dog.  It's my interpretation of the puppy (except I ended up not following the instructions in the book, just did it "my way").  We found Indy on the side of the road near where we were living 3 years ago on July 4th, 2010.  He was pretty ill, anemic from hookworms & needed a blood transfusion or else he would not be here today.  He was also tiny for the age the vet thought based on his teeth.. every time we went to see her, he was "older" than the last time... so here we had a 5 month old (possibly pure German Shepherd) weighing 11 pounds? WTF??? Once he started feeling better, he gained pretty quickly, and now weighs around 50 pounds, but his growth was badly stunted. The vet thinks he may have some blue heeler in him, but a lot of folks now think he's a German Shepherd. Anyway, he's sweet, happy & occasionally hyper... Here's the reference photo and painting: the eyes could use a little work. I'll come back to that another time since I want to practice painting a bit...also need some burnt umber, have been making brown, but I think umber would do the trick.

BTW, I did not use black paint to make his black fur... I'm happy about that!


The next two are an experiment: the first one is acrylic on watercolor paper and the other is acrylic on MDF board.  That was the first time I've done acrylic on watercolor paper. Fun!:


I got the next one out of this book


Wednesday, February 27, 2013

10 day painting challenge with Jane Spakowsky on Facebook

About 6 days ago, Jane (also known as "Gritty Jane") set up a challenge on Facebook to do a painting a day for 10 days. 

Many people in the challenge are up to Day 5 or 6 now, but I finally got started.  Today I decided to work from a Step By Step Animals (acrylic) tutorial book that I have. It's supposed to be realistic, but I think I ended up with something a little more impressionistic. Here's the first step:


Here is the latest version.. I'm probably done with it:


Earlier today, I did another painting but I need to let it sit for a bit and see if I want to do more with it. I won't show it right now.  It was an experiment in my Rte 101 Bowie to Sunset (with possible side trips) project.

 I don't know if I'll enter the earlier painting in the 10 day challenge as I'd like the challenge to be a sort of "learn to paint" thing for me, or rather a way to get a better idea of what I'm doing and see what direction I'd like to go.

I'm not sure what style is "me" yet and don't know if I want to go back to my old abstract style from the early 80s... I'm drawn to folk art/whimsy, as well as a lot of other styles, mostly expression-representative.. the horse portrait above was meant to be realistic, but it was not the first project in the book, so maybe I wasn't building up skills. The reason I picked that one to paint is because the picture I did earlier has a horse in it & the horse doesn't look very good, looks like an afterthought.  One of the other problems with this morning's picture is it has a lot of foreground... just need to think about it a little bit! I may just need to do it over differently.


Friday, January 11, 2013

First painting of 2013, not finished

Here's the first painting I did this year, it's not finished & the painting is now different from how it looks here.. and not necessarily for the better. I don't know if I'll keep working on it or not. I kind of muddied up the rock shed when I did some more work on it, but I may play with it. I've a *long* way to go yet!

The photo quality is poor, but I used my phone camera in iffy lighting. But I'm okay with that because it's an image that's less likely to get stolen! Without further ado: 

                                            The Rock Shed & Emma's Resting Place:


This is done in acrylic, heavy body...

I'm somewhat obsessed with getting this a bit right-er, but what I'll probably do is try a few small studies & maybe come back to this subject and will probably do a bit more on this board.

The other day, I was at Home Depot and I picked up a framing blade for our table saw so that I could cut up the MDF board pieces to smaller sizes...

Yesterday I did a couple of drawings outside... 
I want to play with different subjects, leaning on landscape/townscapes & come up with a style that I'm happy with.. and I'd also like to be able to do something that might make one wonder if it's a photograph or painting.. just to be able to do it, not as my style... :)

Saturday, January 5, 2013

Scratch the 30 paintings in 30 days for this month... I need to do some exercises and learn some painting techniques... maybe I can do a 30x30 another time! Will stick with Piece A Week, though...

What happened was I did a drawing a couple of days ago & then ruined the drawing by labelling the stones with letters to designate which would be lighter & which would be darker, otherwise it might have been a decent drawing! It was of our rock shed with some Wannabe Trees around it... the painting looks okay from a distance but horrid up close... not sure if I'll take a picture or not.

The other issue I have is most of the masonite panels I have are too big. I think I have some more someplace, but I'm not sure where at the moment.  Sometime in the next couple of days I'll go get another piece & have it cut up into sizes like 9x12 and 8x10 and maybe square and maybe 6x8 but no bigger than 12x12...

That's that for now!

Wednesday, January 2, 2013

Happy New Year, everyone! 


I don't do resolutions but have found 2 challenges that I'd like to do: is Piece A Week, which is a private Facebook group.  If you're interested in joining, post a comment & I'll let you know more about it.

The other one is a painting a day for 30 days also known as 30x30...

I reserve the right to not complete all 30 days this month (or ever), but I'll try. 
For starters, since I don't know what I want to paint or what size I want to paint, I'll try different sizes of MDF board that I have, and I've got several pieces in several different sizes... I'll be painting with Liquitex Heavy Body acrylic (from a 12 tube set) and will mostly be using palette knives and may do some Inktense, watercolor or colored pencil paintings... here is a picture of my paintbox:


It's messy, I use a folding table for an "easel" and I tossed a few paintbrushes, pallette knives & one possibility for a color mixing pallete.

I don't know yet what I'm going to paint for subjects, but I'll try different things and go from there...

As far as posting, I'll probably post twice a week...

To see other stuff I've done, check out my regular blog particularly April & May 2012...

Let the madness begin!

Sunday, November 4, 2012

November challenges

Well, November is here and I am doing:

NanoWrimo and Art Every Day Month... they're related... and I won't necessarily do art each day but...
And I may start on a Cowichan inspired jacket for NaKniSweMo... I've got a baby sweater, beret (for me) & scarf (attempting a copycat of something I can't find a pattern for)  ni progress..

No photos at the moment, maybe next time!

Monday, October 22, 2012

Patchwork Girl Paints! part I

I thought I would try blogging here as well as (instead of??) on my home blog. 

Hopefully today I'll have started a new trend with myself: I got out of my sketchbook today & did a painting. Granted it was one of those Creatology Canvas paint kits that you find in Michaels craft store (maybe other places as well, not sure?), with the design outlined & 4 or 5 tiny tubes of dried out colors. I ended up pulling out my Liquitex Acrylic paints & did this:


The angle is weird, but that is because it was hung on the wall by the foot of the bed.. and there were a couple of laundry baskets in the way & I wanted to get close to the picture. Someday I'll learn to take good pictures, OR I'll get someone else to take them for me.
I think of this as a warm-up for familiarization with the materials.
Yes, I used the design that was imprinted onto the canvas.
Yes this is a child's version of paint by numbers.
SO WHAT!!! It was fun!

I don't see how people paint on easels! I used a small folding table & kept turning the painting around to work on it from different angles. I mostly used a painting knife & a couple of small brushes. This piece was on the small side & I think I may enjoy painting on a larger scale... and knowing me, I'll still want to turn the painting around and around as I work on it.

I put it up on the wall, out of reach of the cats, so it can dry overnight & tomorrow I'll see if I want to do any touching up on the colors & maybe put a coat of varnish on it, but may need to wait until Wednesday for that. Need to read the instructions on the varnish bottle first... I think it's 24 hours before you put varnish on.
I figure, if I can keep this up and paint regularly, the 100th painting will be a lot better than this one.
I have several masonite boards (or whatever they are called these days) in different sizes, and I'm not sure how we're going to put them up on the wall; perhaps some type of hooks or sawtooth hangers or similar or come up with some way to store the paintings while they are drying... they can be put in frames later on, but need to find some way to hang them to dry, especially with the cats around... plus having them on the wall is a good way to analyze them & also see progress...

Will just have to keep trying, that's all! And maybe in a few weeks, I'll be able to sell some paintings. I really enjoyed playing with the paint & the texture with the knife and brush. I don't need to have a sharp/clear edge...

If I do work larger (or even a LOT larger), I've got materials to make a ladder like easel, something that I can prop up against the wall.